Lesson: Forming
30 minutes
Standards:
CCSS.ELA-Literacy.RST.6-8.3: Follow precisely a multistep procedure when carrying out experiments, taking measurements, or performing technical tasks.
CCSS.ELA-Literacy.RST.9-10.3: Follow precisely a complex multistep procedure when carrying out experiments, taking measurements, or performing technical tasks, attending to special cases or exceptions defined in the text.
Learning Objectives:
1) Students will follow instructions to successfully complete a project.
2) Students will learn about the forming manufacturing process.
Lesson Outcome:
Students will have their Nanodeks glued-up and pressed in the molds.
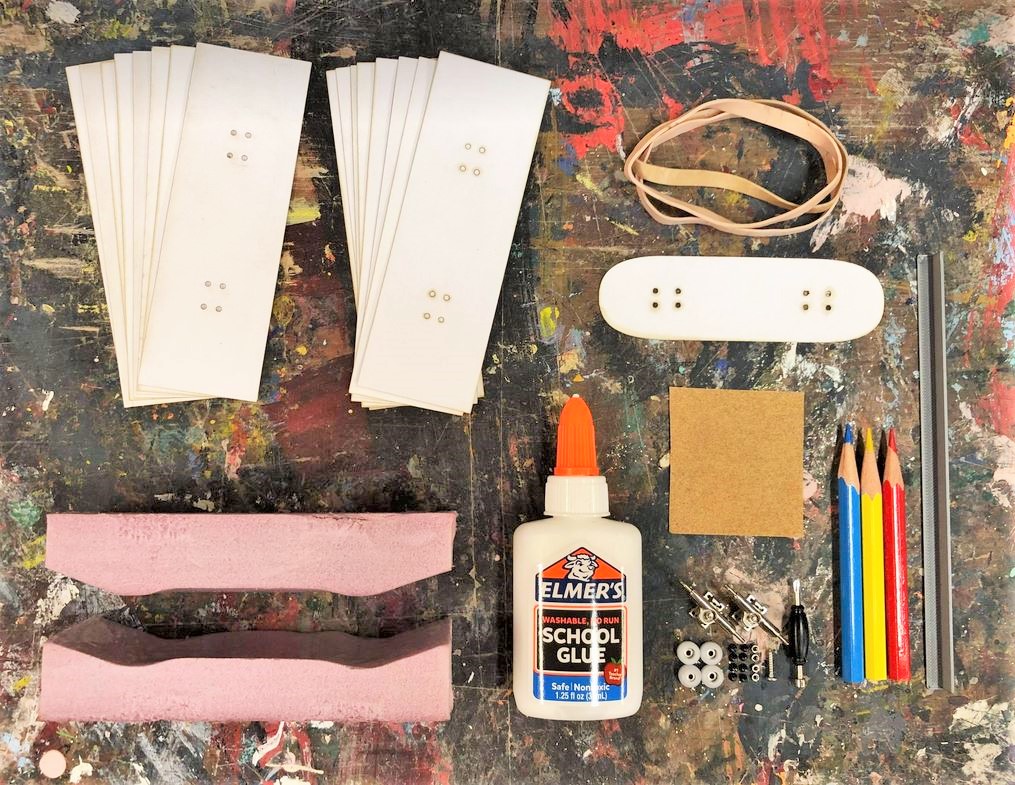
Materials:
- Nanodek Kit
- Table covering (to prevent glue from getting on the table) (recommended)
- Paper towel or napkin (recommended)
Lesson:
1) What is skateboarding? (3-5 minutes)
Many of you have probably seen skateboarders cruising around or doing tricks, and maybe you skate yourself.
Skateboarding example:
2) What is fingerboarding? (3-5 minutes)
Skateboarding exists in a miniature form, called fingerboarding:
Even though the scale is different, the boards have very similar shapes and constructions.
3) What is Nanodek?
A Nanodek is a fingerboard built using the Nanodek build kit. Our first Nanodek will be made from thick paper. (If instructor has a completed Nanodek to show and demonstrate, share it with the students.)
4) Skateboard & Fingerboard Design:
Skateboards & fingerboards are typically made by forming wood. Wood can be formed by gluing together thin pieces of wood called veneers, and pressing those glued veneers between two molds while the glue sets. This process makes the board strong. In our Nanodek kits, we use thick paper instead of wood, but we will still call the paper “veneers”. Since paper is much more flexible than wood veneers, we can press a paper fingerboard using much less force than we’d need if we used wood.
Discussion topic: What are some objects that you have encountered that are made of paper? How are they made strong?
5) Materials (5 minutes)
Open up your Nanodek kits and go through the materials together. Learn all the parts, tools, and their names.
6) Glue-up (15 minutes)
Before we get started, let’s watch a video to see how the Nanodek is glued up and formed (0:09 – 1:56):
Our press uses rubber bands to apply force to the molds and shape our board. The tighter the rubber bands are (the more we stretch them), the more force is applied.
Here are a few final notes before we glue:
- Spread the glue as evenly as possible (you can even use your finger to spread it out). If there are any spots without glue, the board will come apart; if there are any spots with pools of glue, the board may have soft spots.
- Add just enough glue to lightly coat each “veneer”, like a thin coat of paint – if you add too much, the board may get too wet and soft; too little, and the veneers won’t stick together.
- Avoid getting glue on the two outer surfaces of the board because it can leave marks on your finished deck.
- Work quickly to make sure the glue doesn’t dry before you press it!
- Do not overstretch your rubber bands, or else they may break. We found that wrapping each rubber band around the molds twice provides enough force to form the Nanodek.
- Let your Nanodek sit in the mold overnight. When you remove it from the mold, let it sit in a dry (and preferably sunny) spot for around 4 hours, or until your Nanodek no longer feels soft or wet.
Glue up your Nanodeks and set the pressed molds aside in a safe place. Clean up your work area and put your supplies away when done.
Homework:
*Remove your Nanodek from the mold tomorrow, and set it in a dry (preferably sunny) spot for around 4 hours, or until your Nanodek no longer feels soft or wet*
Comprehension Demonstration Questions:
1) What are the pieces of foam called that shape the paper into a fingerboard?
Answer: Molds.
2) Why does glue need to be evenly spread on the “veneers”?
Answer: If there’s not enough glue, the layers won’t stick; if there’s too much, the Nanodek may stay too wet and soft.
3) How do you expect using more or less “veneers” would affect the finished Nanodek?
Answer: Less veneers would create a lighter and more flexible board; more veneers would create a heavier and more rigid board.